Call this Sunday to Get 10% OFF
Call this Sunday to Get 10% OFF
24-Hour Emergency Electricians in Fort WorthCall this Sunday to Get 10% OFF
Call this Sunday to Get 10% OFF
24-Hour Emergency Electricians in Fort Worth
Hardwired smoke detectors are a crucial component of any home safety system, providing reliable protection against fires. These…
Hardwired smoke detectors are a crucial component of any home safety system, providing reliable protection against fires. These devices are directly connected to your home's electrical system, which guarantees a continuous power supply, in contrast to battery-operated detectors.
In this blog post, our professionals from Mr. Electric will walk you through the steps of installing and wiring a smoke detector in a hardwired system, emphasizing the importance of consulting a professional electrician when needed.
The guys were super nice, I loved that they did the work immediately. Also after having a discussion with them about the static electricity from a lightenimg strike we had and it fried everything they suggested a surge protector to keep that from happening again. So we did that.
Scheduled an appointment with Mr Electric of Fort Worth and received a call they were able to show up early and had Dylan show up on time stocked with a full truck. He was able to diagnosis the issue quickly and restore my power to a few plugs that were causing the breakers to trip continuously. Dylan was very knowledgable, clearly explained the cause and how he would fix the issue, and addressed all concerns that we had. He was replaced two breakers and installed 2 new outlets along with diagnosing the problem in about an hour. Very quick and so far seems to have resolved our electrical issue. Would definitely recommend Mr Electric of Fort Worth!
Dylan was so nice and always on time. Very qualified and explained everything he needed to do in a way I understood. My older house required an outside panel so I had a lot of work but Dylan and his helper worked together very well and finished on time so I was not out of power more than needed. Everything looked and worked great when done. I don't know how he was able to replace the cracked power pole and wiring on my roof so quickly and beautifully. I am very, very impressed with his skill level and would request him for any future work. The company is very well organized and office contact was a pleasure to work with(which is rare since these positions are usually underpaid)so reward her well, she is the "door" to your organization. She and Dylan sealed my deal!
Cody was professional, knowledgeable, and was able to provide me with a quick diagnosis pertaining to a wiring issue in one of my rooms. He gave me the price for the repair/modification and fixed the issue all in less than an hour. Thanks Cody!
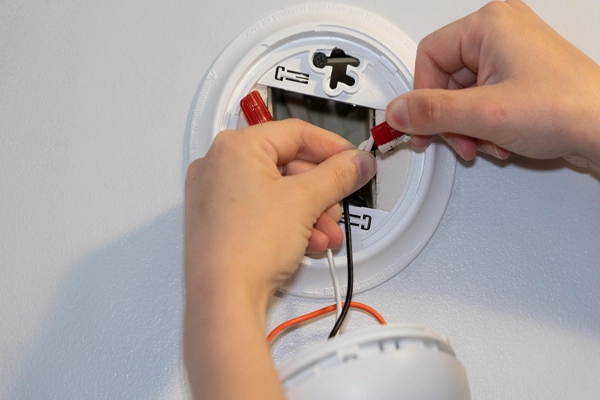
Before beginning the installation, gather all necessary tools and materials. You'll need a smoke detector compatible with hardwired systems, a voltage tester, wire connectors, electrical tape, a screwdriver, and a drill. It's also essential to turn off the power supply at the circuit breaker to prevent any electrical hazards. If you are uncertain about working with electricity, it may be wise to engage an electrical repair service to ensure the installation is conducted safely.
It is essential to select the appropriate location for your smoke detector in order to achieve optimal performance. Smoke detectors should be installed on the ceiling or high on the wall, as smoke rises and is more easily detected at these elevations. Detectors should not be installed in close proximity to windows, doorways, or vents, as this could potentially disrupt their functionality due to drafts. It is advisable to install smoke detectors on each level of your residence, as well as in each bedroom and hallway.
The mounting bracket that is included with your smoke detector can be installed once the location has been determined. Use a drill to create holes for the screws, ensuring the bracket is securely attached to the ceiling or wall. The bracket is essential for holding the smoke detector in place and maintaining its connection to the electrical system.
We provide reliable, professional electrical services backed by licensed electricians and upfront pricing. Our team is committed to safety, quality workmanship, and on-time service for every job. With trusted local expertise and customer-first care, we deliver solutions you can count on.

Wiring the smoke detector to your home's electrical system is a critical step that should be approached with caution. The initial step is to identify the power source and verify that the power is off using a voltage tester. The smoke detector will typically have three wires: black (hot), white (neutral), and either red or yellow (interconnect). Connect the black wire from the smoke detector to the black wire in your electrical box, the white wire to the white wire, and the red or yellow wire to the corresponding wire for interconnection. Wrap the connections with electrical tape to ensure their safety and use wire connectors to secure them.
If you're not confident in your ability to wire the smoke detector correctly, it's wise to call an electrician. Professional assistance is necessary due to the potential consequences of incorrect wiring, including malfunctioning detectors and electrical fires.
Attach the smoke detector to the mounting bracket with precision after the wiring has been completed. Ensure that the electrical box is securely fastened and that all wires are perfectly tucked inside. Restore power to the circuit and test the smoke detector to ensure proper operation following installation. Most detectors have a test button that, when pressed, will emit a loud alarm if the system is working properly.
Are you in need of a smoke detector installation? Luckily, we at Mr. Electric have dedicated workers ready at your service. Contact our representatives for more questions.
Faulty electrical wiring may not raise concerns at first, but delaying professional repairs can cause bigger problems. With this in mind,…
Read More
Electrical hazards are not only hazardous to our health but also cause devastating damage. With this in mind, maintaining electrical outlets…
Read More
Whether you are going to be a parent, grandparent, or guardian, it is essential to prepare your home for the new…
Read MoreA properly installed and functional smoke alarm is not just an option; it is a necessity. This device is your home’s…
Read MoreAs an employer or property owner, it is your responsibility to ensure the protection and safety of all employees. While offices,…
Read More